Version 2 of the popular OS X task management application Omnifocus is about to be released today. I have been testing the beta versions for some time and have seen how the software matured little by little.
Version 2 defers from the previous version in almost every aspect; it contains new features such as the review and forecast perspectives and also the user interface has been modernised. Especially the latter gave rise to many discussions on the support forums about the data density of the new design. Eventually, the Omni Group published a hack to change the layout of the task list back to a table of tasks more similar to Omnifocus 1.
This made me wonder what other ‘secret’ configuration options exist. So far, I have been able to compile the following list.
All configuration options are activated by opening a special URL starting with omnifocus:///change-preference in your browser, which opens Omnifocus and applies the configuration. The URLs in the list are clickable to apply the configuration directly form this post.
Alternate layout
Use omnifocus:///change-preference?ContentLayout=compact to switch to the compact layout, which only uses one line per task. Note that this layout is experimental and still has some issues. To return to the default layout you can use omnifocus:///change-preference?ContentLayout. The alternative layout looks like this:

Hide empty contexts in the main outline
If you’re in a perspective grouped by context, you’ll see that empty perspectives will also show up in the main outline, to mike it easier to reassign tasks by dragging them to another context. If you would rather not see them, you can remove the empty contexts from the main outline with omnifocus:///change-preference?MainOutlineIncludesEmptyContexts=false. You can also pass the parameter true to reactivate the empty contexts.
Hide On Hold projects in forecast view
If you put a project on hold, it’s tasks will still show up in the forecast view. The reasoning is that even though the project is on hold, its tasks still have a due date. If you prefer not to see those tasks on the forecast view, disable them using omnifocus:///change-preference?ForecastIncludesProjectsOnHold=false. Use omnifocus:///change-preference?ForecastIncludesProjectsOnHold to restore the default setting.
Reorganise the side bar
This ‘hack’ is a little bit more complicated. The issue was that the order of the perspectives in the sidebar could not be reorganised. Note that in the final release the default perspectives behave just like any other perspective, and can be organised in any way you like it. However, if you want to freak out with URL schemes, this is the way:
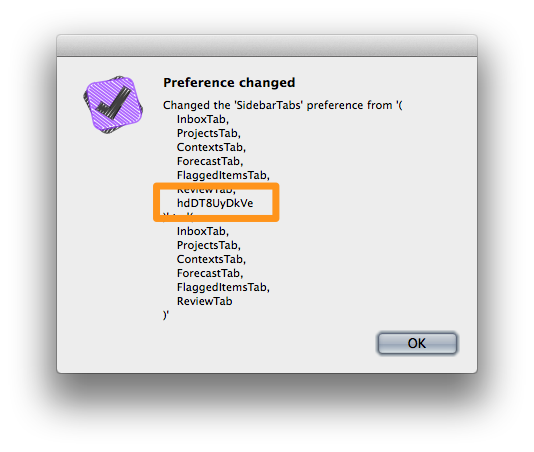
The default perspectives are on top (Inbox, Projects, Contexts…), followed by any starred perspectives. To add another perspective, you first have to star the perspective and open the URL omnifocus:///change-preference?SidebarTabs to get a list of the current tabs. Note the ID of the starred perspective, hdDT8UyDkVe in this case:
Once you know the ID of your custom perspective, you can define the order of the tabs with omnifocus:///change-preference?SidebarTabs=(hdDT8UyDkVe,ForecastTab,InboxTab)
Send clippings directly to the inbox
Whenever you clip something from another application, the Quick Entry window shows up so you can specify some further meta-information about the task – project, context, dates… – and change the task description. If you would rather send the clipped information directly to the Omnifocus inbox, use the configuration URL omnifocus:///change-preference?ClippingsGoToQuickEntry=false.
Sync settings
There are two setting for configuring the synchronisation interval. First, you can set the maximum sync time –in seconds – with omnifocus:///change-preference?MaximumTimeBetweenSync=600 (this sets the maximum to 10 minutes). Use omnifocus:///change-preference?MaximumTimeBetweenSync to restore the default setting of one hour.
The other option is for setting how long after making an edit Omnifocus should synchronise. The URL is omnifocus:///change-preference?TimeFromFirstEditToSync=15 and omnifocus:///change-preference?TimeFromFirstEditToSync to get back to the default setting of one minute.
Toolbar colour
If you have setup your mac to use the ‘Graphite’ appearance instead of the default ‘Blue’ theme, Omnifocus will have black and white icons in the toolbar instead of the modern coloured icons. If you prefer this to be different, you can use omnifocus:///change-preference?ToolbarItemTint=aqua to force the use of coloured buttons or omnifocus:///change-preference?ToolbarItemTint=graphite to get the black and white icons in the toolbar. As usual, with omnifocus:///change-preference?ToolbarItemTint you’ll go back to the default setting.
Set defer date when dragging a task in Forecast view
This option was contributed by Colter in the comments of this post. When in Forecast view, you can drag a task to another date in the calendar to change its due date. You can change the defer date instead by holding the ⌘ key. If you would like to change the defer date by default, you can use the URL omnifocus:///change-preference?ForecastDragSetsDeferDate=true.
Change the project hierarchy separator character
If you’re using folders, OmniFocus will show the complete path in the project selection drop-down list using a colon as the hierarchy separation character, e.g. Personal : Finance. You can configure the character used to separate the project hierarchy with the URL omnifocus:///change-setting?OFMNamedObjectHierarchicalNameSeparator=%20:%20 (note that %20 is the code for a space).
Please leave a comment if you know of any other configuration option for Omnifocus 2; I will keep this post up-to-date.